Converting the VisA Dataset to the MVTecAD Format
Converting the VisA Dataset to the MVTecAD Format
In anomaly detection, organizing dataset structures has a significant impact on downstream pipeline construction and comparative evaluation. In this article, we provide a detailed explanation of a Python script used to convert the VisA dataset into the MVTecAD format, along with the rationale behind the transformation.
1. About the VisA Dataset
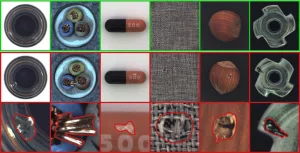
VisA (Visual Anomaly dataset) is a dataset for anomaly detection research and development, released by Amazon in 2022. Its key features include:

- Categories: 12 types of objects ranging from household items to electronic components (e.g., candle, capsules, pcb1–pcb4)
- Anomaly Types: Various defect patterns such as cracks, contamination, deformation, etc.
- Purpose: To support the development and evaluation of high-precision anomaly detection AI
- Annotations: Includes both classification (normal/anomalous) and segmentation masks for anomalous regions
VisA is often used in conjunction with the Spot-Diff method and is highly regarded as a benchmark for learning natural visual differences.

2. Folder Structure of the VisA Dataset
The original structure of the VisA dataset is as follows:
└─Data
    ├─Images
    │  ├─Anomaly        # Anomalous images (e.g., damaged samples)
    │  └─Normal         # Normal images
    └─Masks
        └─Anomaly      # Corresponding masks for the anomalous images (highlighting defect regions)
Masks are only provided for anomalous samples, and not for normal ones. Typically, image files have the .jpg extension, while masks use .png.
3. Standard Data Structure for Anomaly Detection (MVTecAD Style)
Many anomaly detection frameworks assume the MVTec AD structure, making it difficult to use datasets like VisA directly.
Below is the standard folder structure used in MVTecAD-style datasets:
├─ground_truth
│  └─bad            # Mask images for anomalies (white = defect area)
├─test
│  ├─bad            # Anomalous images
│  └─good           # Normal images
└─train
    └─good          # Normal images for training
This format clearly separates:
- Training set = normal images only
- Test set = both normal and anomalous images
- Ground truth = segmentation masks for anomalies
This structure is considered a de facto standard for frameworks like PyTorch and anomalib.
4. Python Script to Convert VisA into MVTecAD Format
4.1 Code Base and Modifications
The script presented here is based on the transformation code from Amazon’s official spot-diff repository, with the following modifications:
- Limited to
split_type='1cls'only: Skips2cls_highshotand2cls_fewshotformats - Unifies file formats to
.png: Converts image files from.jpgto.pngfor consistency with masks - Renames masks: Follows the naming convention
000_mask.png - Binarizes masks: Ensures compatibility when the original mask is not in
uint8format
4.2 Full Script with Inline Comments
import os
import shutil
import csv
from PIL import Image
import numpy as np

# Creates directories if they do not exist
def _mkdirs_if_not_exists(path):
    if not os.path.exists(path):
        os.makedirs(path)

# Main function to convert VisA dataset to MVTecAD format
def prepare_data(data_folder='./VisA/', save_folder='./VisA_pytorch/', split_file='./split_csv/1cls.csv'):
    # List of 12 categories
    data_list = ['candle', 'capsules', 'cashew', 'chewinggum', 'fryum',
                 'macaroni1', 'macaroni2', 'pcb1', 'pcb2', 'pcb3', 'pcb4', 'pipe_fryum']

    for data in data_list:
        train_folder = os.path.join(save_folder, data, 'train')
        test_folder = os.path.join(save_folder, data, 'test')
        mask_folder = os.path.join(save_folder, data, 'ground_truth')

        train_img_good_folder = os.path.join(train_folder, 'good')
        test_img_good_folder = os.path.join(test_folder, 'good')
        test_img_bad_folder = os.path.join(test_folder, 'bad')
        test_mask_bad_folder = os.path.join(mask_folder, 'bad')

        _mkdirs_if_not_exists(train_img_good_folder)
        _mkdirs_if_not_exists(test_img_good_folder)
        _mkdirs_if_not_exists(test_img_bad_folder)
        _mkdirs_if_not_exists(test_mask_bad_folder)

    # Read the CSV split file
    with open(split_file, 'r') as file:
        csvreader = csv.reader(file)
        header = next(csvreader)  # Skip header
        for row in csvreader:
            object_name, set_type, label, image_path, mask_path = row
            label = 'good' if label == 'normal' else 'bad'

            # Convert image from JPG to PNG
            img_src_path = os.path.join(data_folder, image_path)
            image = Image.open(img_src_path).convert("RGB")
            base_name = os.path.splitext(os.path.basename(image_path))[0]
            image_name = base_name + '.png'
            img_dst_path = os.path.join(save_folder, object_name, set_type, label, image_name)
            image.save(img_dst_path, format='PNG')

            print(f"{object_name}:{img_dst_path}")

            # Save mask only for test/bad samples
            if set_type == 'test' and label == 'bad':
                msk_src_path = os.path.join(data_folder, mask_path)
                mask_name = base_name + '_mask.png'
                msk_dst_path = os.path.join(save_folder, object_name, 'ground_truth', label, mask_name)

                mask = Image.open(msk_src_path)
                mask_array = np.array(mask)
                mask_array[mask_array != 0] = 255  # Binarization
                Image.fromarray(mask_array.astype(np.uint8)).save(msk_dst_path)

                print(f"{object_name}:{msk_dst_path}")

# Run script with parameters
if __name__ == '__main__':
    prepare_data(
        data_folder=r'C:/Users/kotai/Downloads/VisA_20220922',
        save_folder=r'C:/Datasets/VisA',
        split_file=r'1cls.csv'
    )
5. Why Convert Mask Values to 255?
Although VisA masks are saved in .png format, their actual data type may not be uint8. Some masks may use values like 1 or 128 instead of 255 to represent anomalies. To standardize masks for use in frameworks like PyTorch, we convert all non-zero values to 255.
This ensures consistent binary mask interpretation:
- 0 = normal
- 255 = anomaly
This is achieved via the line:
mask_array[mask_array != 0] = 255Conclusion
By applying minimal preprocessing, high-quality datasets like VisA can be made compatible with modern AI frameworks for smoother experimentation and evaluation.
We hope this script serves as a reference for adapting other custom datasets to the MVTecAD format.
References
https://github.com/amazon-science/spot-diff?tab=readme-ov-file