Application Note: Leimac Robo Light
 kotai2003
Application Note: Leimac Robo Light
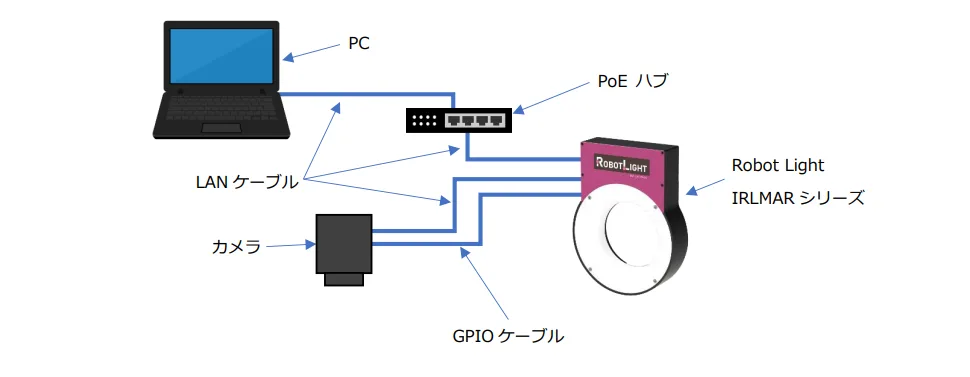
This configuration assumes a scenario in which Leimac's "Robot Light" is used in sync with a camera.
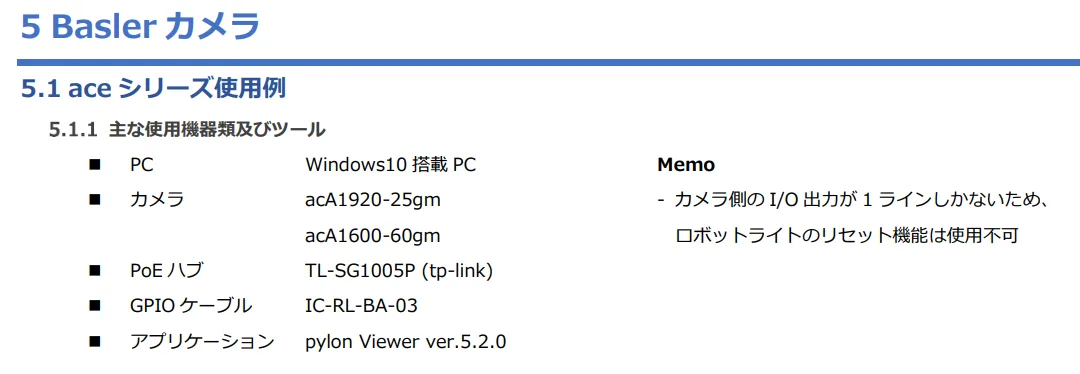
Basler camera settings explained
This section explains how to configure the camera so that it is controlled by a software trigger and Robot Light fires in step with the camera's exposure.
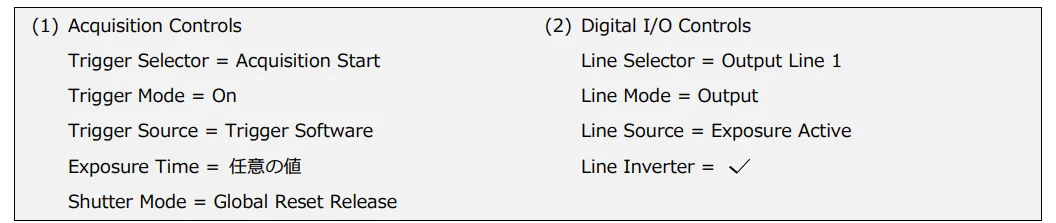
Acquisition Controls settings
These settings define how the camera captures images.
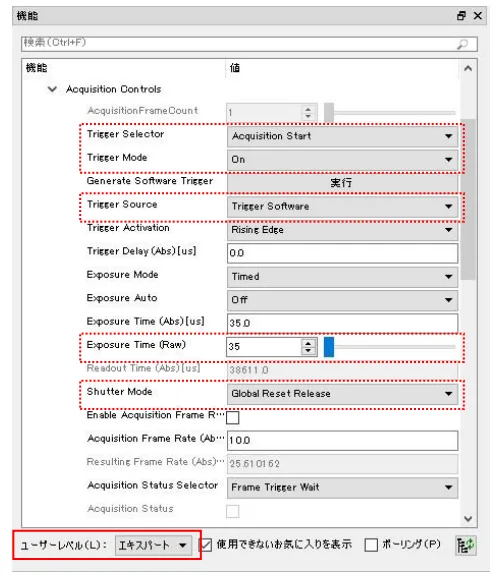
-
Trigger Selector = Acquisition Start-
Meaning: When a trigger signal is received, the camera starts its "entire image acquisition sequence." Rather than starting a single frame, it triggers the start of a broader image acquisition process.
-
Reason: In the example in this application note, camera operation is started in sync with a software trigger.
Acquisition Startis used when a series of image acquisitions, or an entire specific operating mode, is controlled by commands from software. -
-
Trigger Mode = On- Meaning: Enables the camera's trigger function.
- Reason: Unless the trigger function is set to "On", the camera will not accept an instruction to start image acquisition, whether from a software trigger or a hardware trigger. This setting is required for trigger-based control.
-
Trigger Source = Trigger Software-
Meaning: The camera waits for a trigger to be issued by a command from software.
-
Reason: This section of the configuration example is explicitly titled "Setup procedure (synchronized to software trigger)", and is intended for controlling image acquisition from Pylon Viewer or custom software on a PC. It suits cases where Robot Light is also controlled from the software side and synchronized with the camera.
-
-
Exposure Time = any value- Meaning: The user manually sets the camera's exposure time (shutter speed) to a specific value of their choice (in microseconds).
- Reason: The optimal exposure time depends on the application (how fast the object moves, how bright the illumination is, and the desired image brightness and tolerance for blur). Here, rather than automatic adjustment, the user is expected to decide and set the most suitable time to obtain the intended image.
-
Shutter Mode = Global Reset Release- Meaning: Indicates that the camera's shutter method is a global shutter. All pixels on the sensor start and end exposure at the same time.
- Reason: In industrial applications, especially when imaging moving objects, a global shutter is preferred to prevent the image distortion that occurs with a rolling shutter (such as the jello effect). In inspection and recognition applications such as those that use Robot Light, accurate images are essential.
Digital I/O Controls settings
These settings define how the camera's physical input/output pins function. They include the settings for sending signals from the camera to Robot Light.
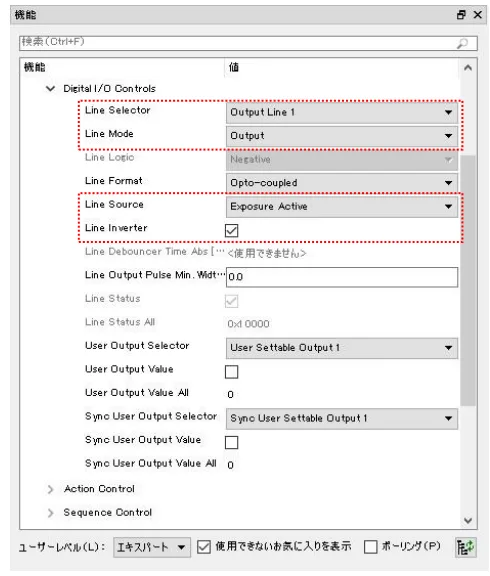
-
Line Selector = Output Line 1- Meaning: Of the camera's multiple I/O lines, "Line1" is selected as the one to configure. The notation "Output Line1" also suggests that this line is designated for output.
- Reason: To send trigger or synchronization signals to Robot Light, the camera must output an electrical signal through a specific I/O line. Here, "Line1" is chosen for that output.
-
Line Mode = Output- Meaning: Configures the selected I/O line (Line 1) in "output" mode, so that the camera can send signals through this pin to an external device (Robot Light).
- Reason: To synchronize Robot Light with camera operation, the camera needs to send the light a signal that controls light ON/OFF. The
Outputsetting is essential for this purpose.
-
Line Source = Exposure Active- Meaning: Defines "when" the signal on the output line (Line 1) becomes active. When set to
Exposure Active, the output line is active only while the camera's sensor is actually exposing (taking in light). - Reason: This is the most important setting for precisely synchronizing Robot Light with the camera's actual exposure period. By turning the light on (or off) only while the camera is capturing an image, illumination is supplied only when needed, which reduces wasted power consumption and extends the life of the light.
- Meaning: Defines "when" the signal on the output line (Line 1) becomes active. When set to
-
Line Inverter = checked- Meaning: Inverts the polarity of the signal output from the output line (Line 1). For example, a signal that would normally be "High" is output as "Low", and vice versa.
- Reason: Used to match the camera's output signal to the signal polarity Robot Light expects (e.g., turning ON when active-low). When the camera's standard output logic differs from the light's input logic, this inversion ensures compatibility.
By combining these settings, the Basler camera starts image acquisition on instruction from software and turns Robot Light on (or off) only during the (exposure) period of that acquisition, achieving the kind of precise synchronized operation commonly used in industrial applications.
Note: the difference between Trigger Selector = Acquisition Start and Frame Start
In Basler camera trigger settings, Trigger Selector is an important item that specifies "what to trigger." The setting most often used in general applications is Frame Start, but Acquisition Start is also useful in certain scenarios.
Trigger Selector = Frame Start (the setting commonly used)
- Meaning: When a trigger signal is received, the camera starts exposing the next frame.
- Role: This is the most common trigger method. It is ideal when you want to synchronize each individual picture (frame) precisely with an external event (e.g., the moment a part passes on a conveyor, or a sensor response).
- Analogy: Like taking one new picture each time you press the shutter button.
Trigger Selector = Acquisition Start (the setting specified in Leimac's documentation)
- Meaning: When a trigger signal is received, the camera starts its "entire image acquisition sequence."
- Role: This is used when you want to control not just the start of a single frame's exposure but the larger overall process of the camera "starting to capture" images. Once an
Acquisition Starttrigger is issued, the camera starts acquiring images according to the configured frame rate and other acquisition modes (e.g., continuous acquisition mode), and the sequence continues until it is explicitly stopped or the set number of frames is reached. - Analogy: Like pressing the record button to start shooting a video. Once triggered, the camera starts generating images continuously according to the configured conditions.
Why Acquisition Start for Robot Light?
Possible reasons why Acquisition Start is specified in documentation intended for use with Leimac's "Robot Light" include the following.
-
Start-up synchronization of the whole system: Robot Light may provide illumination not only for a single image but for an entire inspection process or a series of sequences. Using
Acquisition Startallows a single software command from the PC to synchronize the camera and the entire lighting system in preparing for image acquisition. -
Continuous image acquisition assumed: In the context of the documentation, a scenario may be assumed in which the camera acquires multiple frames continuously while Robot Light keeps emitting light. In this case, it is more efficient to trigger only the timing of the first "start of image acquisition" externally, and then let the camera keep generating images automatically according to its frame rate.
-
Specific application logic: In Leimac's system, the design very likely uses the software trigger as a "master start" signal that controls the camera's whole capture process, with subsequent individual frames acquired according to the camera's internal frame-rate setting.
In summary:
Frame Start: Suited to cases where you want to strictly control the timing of each exposure. ("When to take one picture")Acquisition Start: Suited to cases where you want to start the camera's entire image acquisition process with a single trigger. ("When to start shooting a video")
Because the focus is on starting the "entire capture process" with the camera and Robot Light synchronized, Acquisition Start is thought to have been chosen.